How D I Shrink an Art File While Keepign the Resolution
Need to resize pixel fine art? Acquire how to enlarge your artwork and keep those blocky shapes looking crisp and sharp with Photoshop!
In this tutorial, you'll larn how to get great results when resizing pixel art in Photoshop! Pixel art is unlike from standard images and presents unique challenges when resizing it. Normally when enlarging an prototype and adding more pixels, Photoshop tries to forbid the outcome from looking blocky and pixelated by blending the pixels together and smoothing everything out.
But "blocky and pixelated" is the whole point of pixel art! So to resize pixel art, we demand a way for Photoshop to just add more pixels, and that's it. Instead of smoothing things out, we need to keep the shapes and the edges of the artwork looking crisp and sharp. In this lesson, I'll evidence you lot exactly how to practise it.
Along with resizing pixel art, I besides utilise this same technique for resizing screenshots used in my tutorials. And you tin can use information technology to resize any graphic where yous need to maintain sharp, hard edges or readable text. To get the best results with this lesson, you lot'll want to be using Photoshop CC, merely any version of Photoshop volition work.
I'll use this piffling pixel art graphic symbol that I downloaded from Adobe Stock:
Our pixel art hero. Credit: Adobe Stock.
This is lesson 7 in my Resizing Images in Photoshop series.
Let's get started!
How to enlarge pixel art in Photoshop
Here's the character open in Photoshop. And equally you can run into, he'due south looking pretty small-scale:
The pixel art at its original size.
Step i: Open the Epitome Size dialog box
The best way to enlarge pixel art is by using Photoshop's Image Size dialog box. To open up it, get up to the Image menu in the Menu Bar and choose Image Size:
Going to Image > Paradigm Size.
In Photoshop CC, the dialog box includes a handy preview window on the left, along with the image size options on the right:
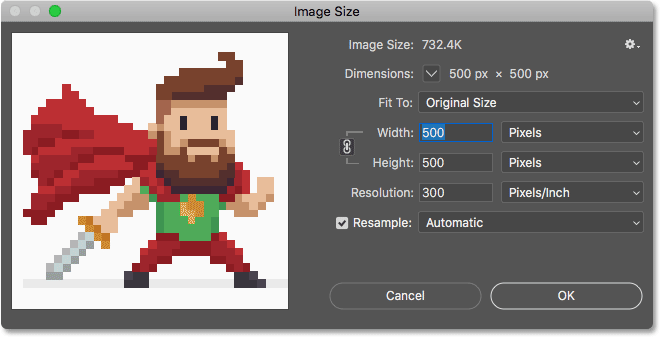
The Image Size dialog box in Photoshop CC.
Viewing the current image size
The current size of the paradigm is found at the top. Next to the give-and-take Dimensions, we come across that my artwork is pretty pocket-size, with a width and elevation of just 500 pixels:
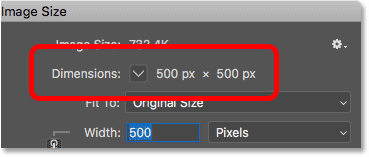
The current pixel dimensions of the artwork.
Step 2: Turn on the Resample option
Allow's say I need to make my grapheme much bigger. Maybe I want to use him in a poster or as a desktop background. To do that, I'll need to enlarge the artwork by calculation more pixels.
Showtime, make sure that the Resample selection in the dialog box in turned on. With Resample off, the pixel dimensions are locked and all we tin change is the impress size. To add or remove pixels, Resample needs to be on:
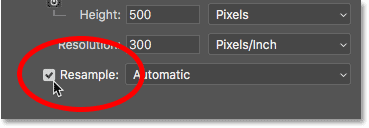
Resample should be on.
Step 3: Enter a percentage into the Width and Pinnacle boxes
Rather than upsampling pixel art to a specific size, the all-time way to enlarge it is by using percentages. And to avert distortions and keep each block in the artwork perfectly square, yous'll want to stick to percentages that are multiples of 100 (and so 200%, 300%, 400%, and and then on). I'll enlarge the prototype by setting both the Width and Height to 400 Per centum:
Upsampling the width and tiptop by 400 percent.
This volition increase the pixel dimensions from 500 px past 500 px up to 2000 px by 2000 px:
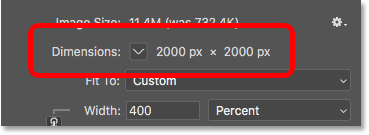
The new pixel dimensions after resizing the artwork.
Resizing the preview window
Notice that, past making the width and height 4 times larger, the artwork is now besides large to fit within the small-scale preview window. To make the preview window bigger, I'll make the Image Size dialog box itself bigger by dragging the lesser right corner outward. Then, I'll click and drag within the preview window to eye the artwork within it:
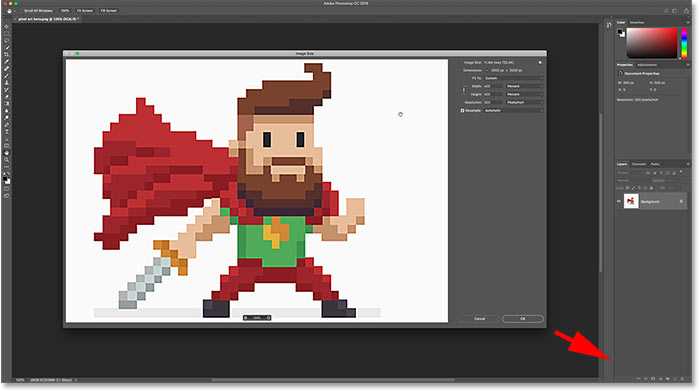
Resizing the Image Size dialog box for a larger preview.
Learn more than: Photoshop CC'south Epitome Size dialog box - Features and Tips
The problem with resizing pixel art
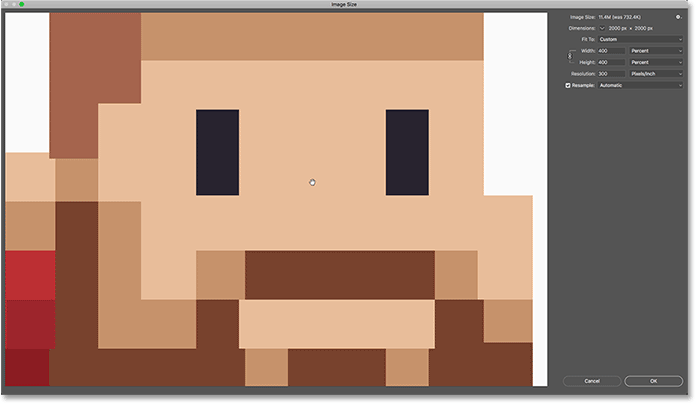
And then far and then practiced. Or is it? If we await at the artwork in the preview window, we see that information technology doesn't expect right. Instead of the edges effectually the shapes looking crisp and precipitous, they're looking a bit soft and blurry:
The edges expect too soft later on enlarging the artwork.
And if we look closer, nosotros can see halos effectually the shapes, especially in college contrast areas. I'll zoom in on the artwork using the zoom buttons at the lesser of the preview window. And here, at a zoom level of 400%, we can clearly run across the halos, especially around the character's optics:
Enlarging the pixel fine art blurred the shapes and added halos around them.
Notice, though, that if you click and agree on the artwork in the preview window, the halos disappear and the edges expect very precipitous, which is exactly what we want:
The pixel fine art looks nifty when yous click and agree.
But as before long every bit you release your mouse button, you're back to seeing the halos:
The softness and halos render when the mouse button is released.
The epitome interpolation method
The reason is that when you click and hold in the preview window, y'all're seeing the upsampled artwork before Photoshop applies whatever paradigm interpolation. Interpolation is how Photoshop averages the pixels together and smooths out the upshot. When you release your mouse button, yous see the artwork with the interpolation applied. And it's the interpolation method that's causing the problems and creating that halo event.
The Interpolation option is found to the right of the Resample option. And by default, it's set to Automated:
The image interpolation pick.
Usually, the Automatic setting is fine because it lets Photoshop choose the all-time method for the chore. But the problem here is that Photoshop assumes we're resizing a standard paradigm with lots of fine item. So it'southward choosing a method that would make a standard image look good. But that same method makes pixel art, and similar types of graphics, look bad. So when upsampling pixel art, nosotros need to choose a dissimilar interpolation method ourselves.
Pace 4: Set the interpolation method to Nearest Neighbor
To do that, click on the Interpolation option to open a list of the methods we can choose from. If you're using Photoshop CC, then the interpolation method Photoshop chooses for upsampling images is Preserve Details. And in Photoshop CS6, information technology chooses Bicubic Smoother. Just neither of them piece of work well with pixel fine art:
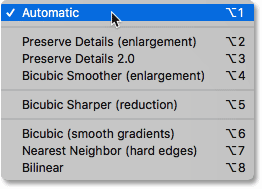
Photoshop's interpolation methods.
To upsample your artwork without averaging the pixels, the interpolation method you lot demand is Nearest Neighbour:
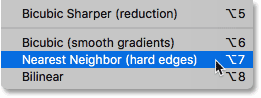
Choosing Nearest Neighbour.
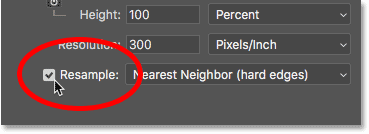
As soon as you lot choose Nearest Neighbor, the artwork in the preview window looks crisp and abrupt! And if you click and agree in the preview window, and and so release your mouse button, you'll see that this time, zip happens. The artwork looks just equally sharp before and after the interpolation method is applied.
That'southward because information technology'due south now the same interpolation method both times. Photoshop always adds the pixels initially using Nearest Neighbor. Only now that we've chosen Nearest Neighbor ourselves, it'south not using anything else that would cause the pixel art to expect worse:
Nearest Neighbor is perfect for upsampling pixel art.
Stride 5: Click OK
When you're prepare to upsample the artwork, click OK to accept your settings and close the Paradigm Size dialog box:
Clicking OK to enlarge the pixel fine art and close the Epitome Size dialog box.
And now, my trivial pixel fine art hero looks a whole lot bigger, yet he still maintains the same blocky, pixelated wait that nosotros'd wait:
The upsampled pixel art.
How to enlarge pixel art - Quick summary
Before we become any further, let'due south rapidly summarize the steps for getting the all-time results when enlarging pixel fine art in Photoshop.
- 1. Open up the Paradigm Size dialog box (Image > Image Size).
- two. Set the Width and Pinnacle to Per centum, and and then for best results, choose a percentage that'southward a multiple of 100 (200%, 300%, 400%, and and so on).
- iii. Change the interpolation method to Nearest Neighbour.
- 4. Click OK.
How to resize pixel art to an exact size
So far, we've learned that the best way to overstate pixel art is by upsampling it using a pct that's a multiple of 100. But what if you need to enlarge it to specific pixel dimensions, and you can't get there using ane of those percentages?
For instance, by upsampling my artwork past 400%, I've enlarged the width and height from 500 pixels upwards to 2000 pixels:
The dimensions of the upsampled artwork.
But what if I needed the width and pinnacle to exist something a chip smaller, like 1600 pixels? If I had upsampled my 500 px ten 500 px image by 300%, it would take made the width and pinnacle merely 1500 pixels, leaving information technology still too minor. And upsampling it by 400% fabricated it too big. What I really needed was something in between. In that case, what you'll want to exercise is resize the artwork in 2 steps.
Pace 1: Upsample the pixel art equally a percent
Outset, upsample the pixel art using a percentage, and a multiple of 100, that will arrive larger than you need. In my example, I've already done that by upsampling it by 400%, and so the commencement pace is done.
Pace two: Re-open up the Prototype Size dialog box
Then, resize information technology a second fourth dimension, this time to downsample it to the exact pixel dimensions. To practise that, open up the Image Size dialog box again by going upwardly to the Image menu and choosing Image Size:
Going to Image > Epitome Size.
Footstep iii: Leave the Resample choice turned on
Brand sure the Resample option is still on and so you can change the number of pixels:
Leaving the Resample option checked.
Step 4: Prepare the Width and Meridian, in pixels
Enter the exact size you need, in pixels, into the Width and Height fields. I'll gear up them both to 1600 pixels:
Inbound the new pixel dimensions.
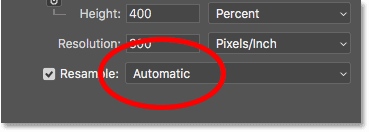
Step 5: Fix the interpolation method to Automatic
And finally, while the Nearest Neighbour interpolation method works nifty for upsampling pixel fine art, you don't want to use it when downsampling. Instead, for the sharpest results, modify the interpolation method back to Automatic. This volition hand control back to Photoshop, and when downsampling images, information technology will automatically choose Bicubic Sharper:
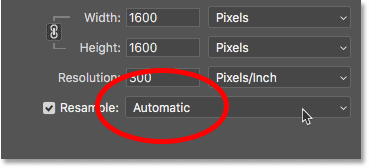
Setting the interpolation method back to Automatic.
When y'all're set to resize the artwork to the verbal size, click OK to close the dialog box, and y'all're done:
Clicking OK to downsample the pixel art.
And there nosotros have it! That's how to go the best results when resizing pixel fine art, screenshots, or similar graphics, in Photoshop! In the adjacent and final lesson in this series, we'll wait at the best way to overstate images in Photoshop using a brand new feature known as Preserve Details 2.0!
Y'all can jump to any of the other lessons in this Resizing Images in Photoshop affiliate. Or visit our Photoshop Nuts section for more topics!
Source: https://www.photoshopessentials.com/basics/how-to-resize-pixel-art-in-photoshop/
0 Response to "How D I Shrink an Art File While Keepign the Resolution"
Post a Comment